
I had an idea recently for a project that I both wanted to use SFML for, and wanted lots of buttons and controls. My instinct was to use SFML.Net and C#, specifically with a WPF window so I could use XAML for my layouts.
Actually getting the two to work together was harder than I expected though. But I managed to get a working setup going, which I’ll document here step-by-step.
I’m using Visual Studio Express 2013 for Windows Desktop as my IDE, and SFML.Net 2.2 (32-bit).
Adding References
First create a new WPF Application. Then you need to add two framework references: System.Windows.Forms and WindowsFormsIntegration. Just right-click the “References” item inside your project in the solution explorer and pick “Add Reference…”.
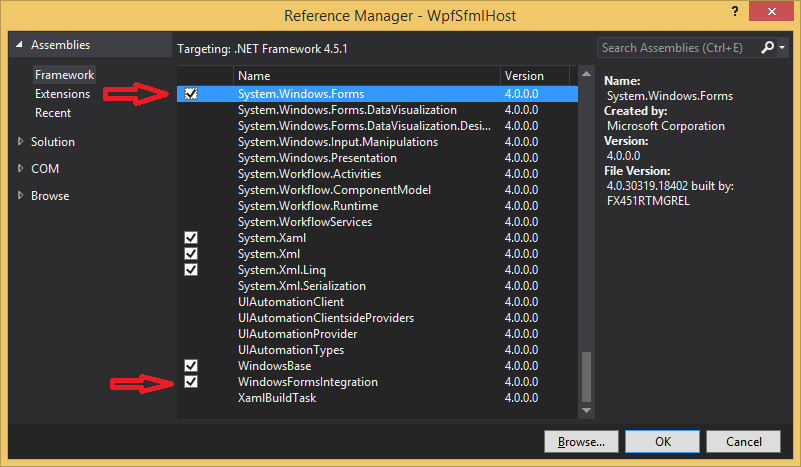
Next up you need to add the DLL files for SFML.Net. (If you don’t have them, download them from the site.) Again open the “Add Reference…” window, but this time pick the Browse tab, then click the “Browse…” button and add the DLL files from the “lib” folder of the SFML.Net package you downloaded. (sfmlnet-audio-2.dll, sfmlnet-graphics-2.dll, sfmlnet-system-2.dll, sfmlnet-window-2.dll)
Finally you need to add the DLL files for the executable to use. In the “extlibs” folder of the SFML.Net library you downloaded there should be several .dll files starting with “csfml-“, drag those from the folder directly onto your project in the Solution Explorer in Visual Studio, they should show up under your project.
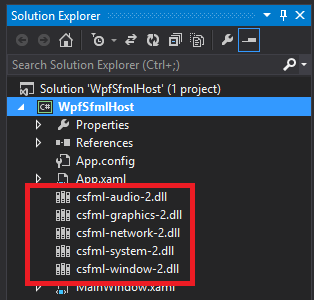
Now right-click each of those DLL files in the Solution Explorer and pick “Properties” (you can also shift-click to select them all). In the Properties window, set the “Copy to Output Directory” value to “Copy Always”.

A Control to Render on
SFML.Net isn’t designed for use with WPF, but it can handle WinForms. Which is why we added the System.Windows.Forms and WindowsFormsIntegration references. We need to have an SFML RenderWindow use a custom WinForms control, which is hosted inside a WPF control built specifically to house WinForms controls. If that makes sense…
First we’re going to create the WinForms control that the SFML RenderWindow will use for hosting the RenderWindow. Right-click your project in the Solution Explorer and pick “Add > New Class…”. Name it SfmlDrawingSurface.cs. We need it to extend the System.Windows.Forms.Control class so we can prevent OnPaint() and OnPaintBackground() from being called. Because we want an SFML RenderWindow to do the painting.
Here’s the code for the control:
namespace WpfSfmlHost
{
public class SfmlDrawingSurface : System.Windows.Forms.Control
{
protected override void OnPaint(System.Windows.Forms.PaintEventArgs e)
{
//base.OnPaint(e);
}

protected override void OnPaintBackground(System.Windows.Forms.PaintEventArgs e)
{
//base.OnPaintBackground(e);
}
}
}
Designing the Window
For the actual window the program uses I’m going to keep it simple. Just the containing control and a button. The control will contain an SFML RenderWindow where we’ll display a circle. Clicking on the RenderWindow will relocate the circle to the mouse position. Clicking the button will randomly change the color of the circle.
The project should have been created with a MainWindow class. Here’s the code I used for the XAML:
<Window x:Class="WpfSfmlHost.MainWindow"
xmlns="https://schemas.microsoft.com/winfx/2006/xaml/presentation"
xmlns:x="https://schemas.microsoft.com/winfx/2006/xaml"
xmlns:wpfSfmlHost="clr-namespace:WpfSfmlHost"
Title="SFML and XAML!" Height="350" Width="525" >
<Grid>
<Grid.RowDefinitions>
<RowDefinition Height="*"/>
<RowDefinition Height="Auto"/>
</Grid.RowDefinitions>

<WindowsFormsHost Grid.Row="0">
<WindowsFormsHost.Child>
<wpfSfmlHost:SfmlDrawingSurface x:Name="DrawSurface"
SizeChanged="DrawSurface_SizeChanged"/>
</WindowsFormsHost.Child>
</WindowsFormsHost>

<Button Grid.Row="1"
Click="Button_Click"
Content="Change Color"
HorizontalAlignment="Left"
Margin="4" />
</Grid>
</Window>
Notice the wpfSfmlHost XML namespace parameter in the opening Window tag. Its name and value should be named appropriately for your project.
The window simply contains a grid with two rows. The first row stretches to fill the rest of the space that the second row does not use. The second row is only as big as necessary to contain its contents, in this case a single button.
One very important thing to note here is the SizeChanged event handler for the SfmlDrawingSurface. SFML RenderWindows don’t resize how we would like. When the SfmlDrawingSurface container changes, the RenderWindow contents will be stretched to fit the new size of the SfmlDrawingSurface. However when that happens the mouse event handlers still end up being passed the pixel location values we would expect. It leads to strange and undesirable behavior. Remove the SizeChanged event handler from the XAML to see for yourself.
So to fix that issue we’ll create a new RenderWindow every time the SizeChanged event fires on the SfmlDrawingSurface.
Window Code-Behind
Finally we need to write code to actually do things. In particular:
- Handle the
SizeChangedevent for theSfmlDrawingSufrace - Handle the
Clickevent for the button - Handle mouse button presses on the
RenderWindow - Actually create the
RenderWindowobject - Set up a timer that clears and draws the contents of the
RenderWindow
Here’s the code-behind for MainWindow.xaml.cs:
namespace WpfSfmlHost
{
using SFML.Graphics;
using SFML.System;
using SFML.Window;
using System;
using System.Windows;
using System.Windows.Threading;

public partial class MainWindow : System.Windows.Window
{
private RenderWindow _renderWindow;
private readonly CircleShape _circle;
private readonly DispatcherTimer _timer;

public MainWindow()
{
this.InitializeComponent();

this._circle = new CircleShape(20) { FillColor = Color.Magenta };
this.CreateRenderWindow();

var refreshRate = new TimeSpan(0, 0, 0, 0, 1000 / 60);
this._timer = new DispatcherTimer { Interval = refreshRate };
this._timer.Tick += Timer_Tick;
this._timer.Start();
}

private void Button_Click(object sender, RoutedEventArgs e)
{
var rand = new Random();
var color = new Color((byte)rand.Next(), (byte)rand.Next(), (byte)rand.Next());
this._circle.FillColor = color;
}

private void CreateRenderWindow()
{
if (this._renderWindow != null)
{
this._renderWindow.SetActive(false);
this._renderWindow.Dispose();
}

var context = new ContextSettings { DepthBits = 24 };
this._renderWindow = new RenderWindow(this.DrawSurface.Handle, context);
this._renderWindow.MouseButtonPressed += RenderWindow_MouseButtonPressed;
this._renderWindow.SetActive(true);
}

private void DrawSurface_SizeChanged(object sender, EventArgs e)
{
this.CreateRenderWindow();
}

private void RenderWindow_MouseButtonPressed(object sender, MouseButtonEventArgs e)
{
this._circle.Position = new Vector2f(e.X, e.Y);
}

private void Timer_Tick(object sender, EventArgs e)
{
this._renderWindow.DispatchEvents();

this._renderWindow.Clear(Color.Black);
this._renderWindow.Draw(this._circle);
this._renderWindow.Display();
}

}
}
Notice that the partial class is declared as extending System.Windows.Window. This is because the SFML.Window namespace also has a delcaration for Window, so you need to specify which one MainWindow is inheriting from. Alternatively, since that class is already referenced in the XAML part of the class, you can remove the : System.Windows.Window part of the class declaration entirely.
The DrawSurface_SizeChanged() method handles the SizeChanged event for the SfmlDrawingSurface. Likewise Button_Click() handles the Click event for the “Change Color” button.
The MouseButtonPressed event handler actually has to be created and set in the code-behind because the RenderWindow control doesn’t exist in the XAML. The event handler is set on line 46 and implemented with the RenderWindow_MouseButtonPressed() method.
The code that handles actually creating the RenderWindow is in, appropriately enough, the CreateRenderWindow() method. Notice that the event handlers need to be set every time the RenderWindow is replaced.
And finally the timer is created and activated at the end of the constructor. I set the time interval to 60 frames/second. Its event handler simply dispatches any events the RenderWindow needs to deal with (in this case that would only be mouse button pressed events). Then clears the display, draws the circle, and shows the display.
Final Thoughts
This setup seems like it should work fine enough. The only thing I’ve noticed it can’t do is allow the RenderWindow to handle keyboard events. This is because the SfmlDrawingSurface we created inherits from System.Windows.Forms.Control which is non-focusable and thus can’t accept keyboard events. You can enable that by instead inheriting from System.Windows.Forms.UserControl. However, depending on what you’re doing with your XAML and WPF for your application, it may be better to handle keyboard input with the Window’s keyboard event handlers.
The current implementation here is locking the update code to the framerate. Many sources will tell you that’s a bad approach, and I would tend to agree. However, proper game-engine optimization is not the point of this article.
And finally, I’ve put a copy of this project on GitHub.